Sunday, September 23, 2012

Connecting a DS212j NAS Directly to a Computer Without Using a Router

Background

I had the problem that I wanted to transfer about 100 GB of video files from my old Windows XP PC to my new Synology DS212j NAS (Networked Attached Storage). The network environment consisted of the DS as NAS, connected via cable to an airplay express wlan router (connected to a cable modem) and the PC connected via wlan to the network. One complication concerning this set-up was that the PC is quite far away from the airport express, resulting in a quite low bandwidth resulting in transfer times for the data of several ten hours.
My goal was to connect the Disk Station directly via cable to the ethernet port of the PC to benefit from the 1 GBit transfer rates of the cable connection.

One note: if you like this post, I'd be happy if you clicked on the ads banner ;)

Realization

Before you start to move your NAS to the PC direct "network", you have to note the network settings of the NAS in the standard network with the router. IN case of the Synology DS212j do the following:

1. Open the DSM - Disk Station Management Console. This can either be done by using the Synology "Assistant" program (needs to be downloaded from the Synology website) or you can open the DSM by typing <ip address of your DS>:5000.  
2. In DSM start the Control Panel and click in section "System" on "Network":


3. In the network settings go to the tab "Network Interface":


Make sure that your network configuration is set to manual. If not done already, choose an appropriate IP address for your DS together with a subnet mask that fits to your wlan router setup. Note the IP address, you will need it to do the proper configuration of the network settings of your PC as soon as the NAS is connected directly to it. Save this configuration. and shut down the NAS.

You have to connect the DS212j - and any NAS having an ethernet port - directly to the PC by using a crossed (this is important) ethernet cable not a standard one. After having realized the hardware set-up (PC + NAS) you have to play a bit with the network settings of the PC.
In the windows control panel start the network setting tool. Quite likely, the network settings of your PC are set to wlan. Disable the wireless connection - and don't forget to switch it on again if you are done with your work ;). Now go to the network settings of the ethernet LAN and there configure the TCP/IP settings. Similar to the NAS set the network address configuration to "manual". Now you have to choose an ip address for your computer which is differing only in the last number from those of the NAS (in my example I choose 10.0.1.1) and choose an appropriate subnet mask (255.255.0.0 worked for me). Save your changes.
You can check if your changes work by using the ping command. To use it open a console in Windows (programs --> run --> type in "cmd"), then type in: ping <ip number of NAS> (in my example "ping 10.0.1.5). If the PC and the NAS are connected properly, the system will respond to the ping command with something like:
"64 bytes from 10.0.1.5: icmp_seq=35 ttl=64 time=3.856 ms"

Now you can open the NAS drives like any other. However, it will not be available by standard in the explorer of Windows. You have to open the drive via "programs" --> "run" and typing in the drive/path of the folder you want to open. The only problem I encountered was that the drive could not be opened by its name, but I had to use the ip of the drive. Meaning I had to type:
<ip of NAS>∕<directory> (example: "10.0.1.5∕video")

Now it was time to copy my video data and it worked like a fly.

I hope you got something out of this blog and you enjoyed.


Tuesday, September 11, 2012

Model View Control (MVC) Pattern Using C# - Real Life Example

Note: this is a copy of my original article which I published on c-sharpcorner

Introduction

There are tons of articles around in the web dealing with the implementation of the Model View Controller (MVC) pattern. Nevertheless, I had a hard time finding one usable as a kind of blueprint for a little software project of mine - a Windows Forms application with database access and data table display using the .NET DataGridView. Finally I found Matthew Cochran's article: Introduction to Model View Control (MVC) Pattern using C#
which helped me a lot in getting an MVC up and running.

Still, I always thought that it would have been useful for me to have something closer to real life - and involving a .NET DataGridView. This is what I want to provide in this blog, even if it shows work in progress.

Technical Framework

System: WinXP SP3

.NET version: 4.0

IDE: Visual Studio C# 2010 Express

DB: SQL Server Express 2008 Express
The UI 
Here is what I wanted: a simple UI which enables the user to edit data stored in a database table. The user should be able to view the current data available in the DB, edit values of existing DB table entries, add lines to the data, delete lines and save the data. In the end I want to have a user interface to maintain a couple of database tables. The individual tables are accessible via a dropdown menu in a main window. Each user request from the main window invokes a form for editing data stored in one DB table:
 
ScrumMngr_1.png
 
The window called by the user command looks like this:
 
Model View Control1
 
The mouse points to what will become the save button.

So far I have implemented only data retreval from the DB, changing data in the UI and saving this data back to the DB. The "delete line" and "add line" features are still missing, but I think the existing functionality is enough to show the principles.
The Model
The model is responsible for any DB interaction and data manipluation. Following Matthew's article I created an interface for the model:
 
public interface IDBTableEditorModel
 #region Methods
 void addLineToTable();
 void addObserverView(IDBTableEditorView inTeamTypesView);
 void deleteLineFromTable();
 void notifyObserverView();
 DataTable readDataFromDB();
 void writeDataToDB(DataTable in_DataTable);
 #endregion

Note: Don't get irritated by the order of the methods - I just like sorting them alphabetically...
As one might guess by the interface name, I want to use this model in the future to handle DB table data independent of the concrete DB table. This is similar to Matthew's IVehicleModeltogether with the implementation in class Automobile.

The interface is then implemented in an abstract class which serves as a blueprint for the table dependent implementation and which implements the MVC-relevant logic:
 
public abstract class classDBTableEditorModel : IDBTableEditorModel{
 #region Attributes
 IDBTableEditorView theTeamTypeView;
 string viewType;
 #endregion public classDBTableEditorModel(string inViewType)
        {
 this.viewType = inViewType;
        }
 public void addObserverView(IDBTableEditorView inTeamTypeView)
        {
            theTeamTypeView = inTeamTypeView;
        }
 public void notifyObserverView()
        {
            theTeamTypeView.updateUserInterface(this);
        }
 public void deleteLineFromTable()
        {
        }
 public virtual void writeDataToDB(DataTable inDataTable)
        {
        }
 public virtual DataTable readDataFromDB()
        {
 DataTable lt_DataTable = new DataTable();            //Add code for concrete data retreval here in concrete class return lt_DataTable;
        }
    } 

Note: those methods that require table-specific logic have the attribute "virtual".

In this specific example I'm dealing with a DB table called "TeamTypes" and which has 3 columns (TeamTypeID (char(3)), TeamTypeDesc (varchar(100)), TeamTypeNumber (bigint)). Thus I have to create a specific table-dependent implementation of my virtual base class called "classTeamTypesModel", in this class I have to override the two "virtual" methods:
 
class classTeamTypesModel : classDBTableEditorModel{
 public classTeamTypesModel(string teamTypeName):base(teamTypeName)
        {
        }
 public override DataTable readDataFromDB()
        {
 DataTable lt_TeamTypes = new DataTable();
 //Read data from DB via connector try            {
                lt_TeamTypes = classSqlServerConnector.Instance.TeamTypeReadAll;
            }
 catch { }
 return lt_TeamTypes;
        }
 public override void writeDataToDB(DataTable inDataTable)
        {
 classSqlServerConnector.Instance.TeamTypeUpdateRecords(inDataTable);
        }
} 

Note: the classSqlServerConnector is not part of the MVC, but hosts all the functionality to read/write data from/to the DB and will not be discussed here.

The Controller

Following Matthew's article I created an interface for the controller as well:
 
 public interface IDBTableEditorController
    {
 DataTable onView_Load();
 void onButtonSave_Click(DataTable inDataTable);
 void onButtonDeleteLine_Click();
 void onButtonAddLine_Click();
 void onCellData_Changed();
 void setView(IDBTableEditorView inTeamTypesView);
 void setModel(IDBTableEditorModel inTeamTypesModel);
    } 

The corresponding implementation of this interface looks like this:
 
    public class classDBTableEditorController : IDBTableEditorController    {
 #region Attributes
 IDBTableEditorModel theTeamTypesModel;
 IDBTableEditorView theTeamTypesView;
 #endregion
 public classDBTableEditorController(IDBTableEditorModel 
        inTeamTypesModel, IDBTableEditorView inTeamTypesView)
        {
 this.theTeamTypesModel = inTeamTypesModel;
 this.theTeamTypesView = inTeamTypesView;
        }

 public classDBTableEditorController()
        {
        }
 public void setModel(IDBTableEditorModel inTeamTypesModel)
        {
 this.theTeamTypesModel = inTeamTypesModel;
        }
 public void setView(IDBTableEditorView inTeamTypesView)
        {
 this.theTeamTypesView = inTeamTypesView;
        }
 public DataTable onView_Load()
        {
 return theTeamTypesModel.readDataFromDB();
        }
 public void onButtonSave_Click(DataTable inDataTable)
        {
 if (theTeamTypesModel != null)
            {
                theTeamTypesModel.writeDataToDB(inDataTable);
            }
 else            {
                throw new Exception("Error in initializing model to controller: TeamTypes");
            }
        }
 public void onButtonAddLine_Click()
        {
        }

 public void onButtonDeleteLine_Click()
        {
        }

 public void onCellData_Changed()
        {
        }
    }

The View
 
For the view on ehas to implement the logic in the class code coming with the UI elements. Still, I implemented additionally a view interface:
    public interface IDBTableEditorView    {
 void addObserver(IDBTableEditorController theController);
 void updateUserInterface(IDBTableEditorModel inTeamTypeModel);
    }

The corresponding view implementation looks like this:
public partial class formTeamTypes : Form, IDBTableEditorView{
 private IDBTableEditorController theTeamTypesController = new classDBTableEditorController();
 private IDBTableEditorModel theTeamTypeModel = new classTeamTypesModel("Test");
 public formTeamTypes()
        {
            InitializeComponent();
 this.initialize(theTeamTypesController, theTeamTypeModel);
        }
 public void initialize(IDBTableEditorController inTeamTypesController, IDBTableEditorModel inTeamTypesModel)
        {
            if (theTeamTypeModel != null)
            {
            }
            theTeamTypeModel = inTeamTypesModel;
            theTeamTypesController = inTeamTypesController;
            theTeamTypesController.setModel(theTeamTypeModel);
            theTeamTypesController.setView(this);
            theTeamTypeModel.addObserverView(this);
        }
 public void addObserver(IDBTableEditorController inTeamTypesController)
        { this.theTeamTypesController = inTeamTypesController;
        }
 public void updateUserInterface(IDBTableEditorModel inTeamTypeModel)
        {
 this.dataGridTeamTypes.Update();
        }
 private void formTeamTypes_Load(object sender, EventArgs e)
        {
     //When Form is called, the data for Team Types are read from DB            dataGridTeamTypes.DataSource = theTeamTypesController.onView_Load();
            dataGridTeamTypes.Columns[0].HeaderText = "Type ID";
            dataGridTeamTypes.Columns[1].HeaderText = "Type Description";
            dataGridTeamTypes.Columns[2].Visible = false;
     //Add a fourth virtual column for a marker flag to mark changed rows            dataGridTeamTypes.Columns.Add("ChangedFlag", "Changed Flag");
            dataGridTeamTypes.Columns[3].Visible = false;
        }
 private void buttonSave_Click(object sender, EventArgs e)
        {
 DataTable lt_RowsForUpdate = new DataTable();
 DataRow ls_DataRow;
            //Build internal table with rows for update            lt_RowsForUpdate.Columns.Add("TeamTypeID");
            lt_RowsForUpdate.Columns.Add("TeamTypeDesc");            lt_RowsForUpdate.Columns.Add("TeamTypeNumber");
            lt_RowsForUpdate.Columns.Add("Changed");            //Check for Changes and write to DB for (int i = 0; i < dataGridTeamTypes.Rows.Count; i++)
            {
 if (dataGridTeamTypes.Rows[i].Cells[3].Value != null && 
                    dataGridTeamTypes.Rows[i].Cells[3].Value.ToString() == "C")
                {
                    ls_DataRow = lt_RowsForUpdate.NewRow();
                    ls_DataRow[0] = dataGridTeamTypes.Rows[i].Cells[0].Value;
                    ls_DataRow[1] = dataGridTeamTypes.Rows[i].Cells[1].Value;
                    ls_DataRow[2] = dataGridTeamTypes.Rows[i].Cells[2].Value; 
                    lt_RowsForUpdate.Rows.Add(ls_DataRow);
                }
            }
            theTeamTypesController.onButtonSave_Click(lt_RowsForUpdate);
        }
        private void dataGridTeamTypes_CellValueChanged(object sender, DataGridViewCellEventArgs e)
        {
     //Mark rows which have been changed            if (e.RowIndex >= 0)
            {
                dataGridTeamTypes.Rows[e.RowIndex].Cells[3].Value = "C";
            }
        }
}

Note: marking the changed rows with a "C" might be a bit clumsy, but I didn't find a better way. Maybe you have a better one - I'd be glad to get to know about it. 
Calling the MVC from the Application
 
The whole MVC cluster is called by the standard invocation of the form from wherever (here from the event menu item XYZ_clicked:
 
        private void defineTeamTypes_Click(object sender, EventArgs e)
        {
 formTeamTypes theTeamTypesForm = new formTeamTypes();
            theTeamTypesForm.Show();
        }

Conclusion

I hope this real-life example adds a bit to Matthew's article and shows how things can be realized when working with a database.
 
Enjoy!

Wednesday, September 5, 2012

Synology DS212j - Experiences and Usage Scenarios


This is the fourth of blog posts wherein I describe my experiences with setting up a Synology disk station DS212j by re-using a hard disk which I recovered from an Apple Time Capsule wlan router & NAS which quitted service. In this post I want to describe my experiences with the new device after having the hardware up and running.

Set-Up and Installation


The setup of the DS is quite simple if you have a SATA hard disk at your disposal which is either empty or does not contain valuable data: the disk will be formatted during the setup process. As described in the first post of this series the installation procedure is started via a Synology desktop application which is called "DS Finder" and which available (at least) for Windows and Mac OS X. The Disk Station is detected via WLAN if it has been connected to a WLAN router. If the DS has not been set-up before, the DS Finder will list it as "Not Installed".
One thing you have to ensure at this point is that you have an installation file of DSM, the Disk Station operating system available, which can be downloaded from Synology. On the next screen you are asked to tell the program where this installation file is located.
After having started the installation process it is time to go for a loooong coffee break. For my 1TB WD hard disk (from the Time Capsule) the formatting and installation process took about 5-6 hours...

System Configuration

When the coffee break is over, it is time to login for the first time to the system. This can be done via the DS Finder tool -which opens a browser window - or via a web browser. The Disk Station is available at
<ip address>:5000
At the first login you have to use the default admin account, which does not have a password per default. The first configuration I did was giving the admin a password...
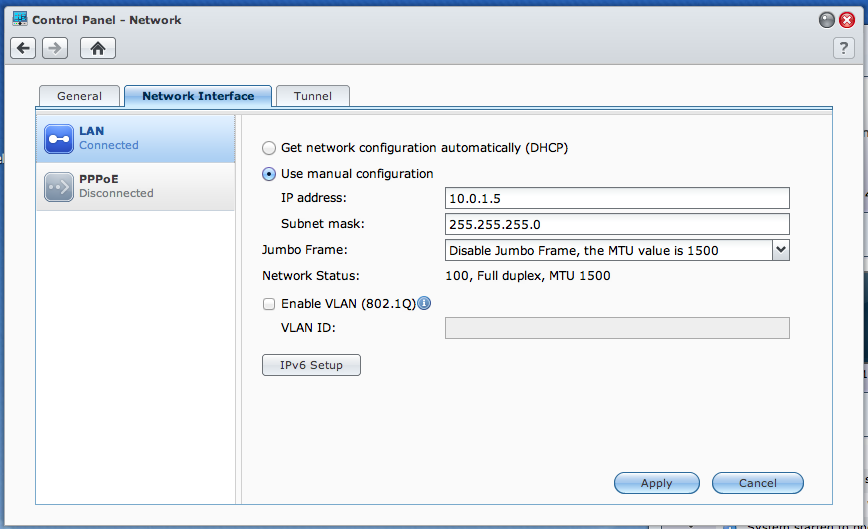
If you don't want to access the Ds through DS Finder (which I didn't want either) it is good to assign the DS a static IP so you can be sure which IP:5000 combination to type in the browser. One can do this by opening in DSM:

System Control --> System --> Network

On the tab "Network Interface", LAN settings you can choose between automatic IP (DHCP) and manual IP assignment. To assign a static address, choose "manual" and enter network config data of your choice.
Work in progress...

Creation of Users

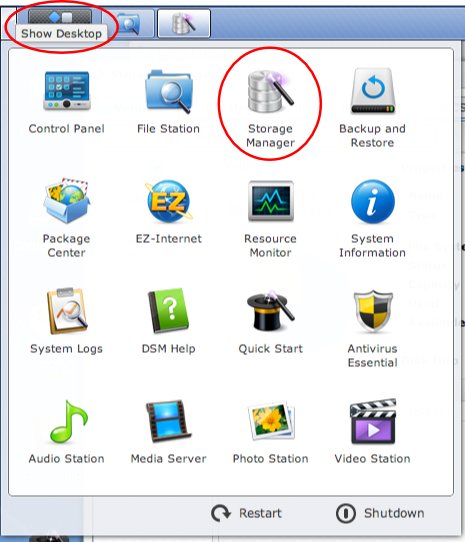
The next thing to do is to think about users being allowed to access the DS. This can be done via the Control Panel which is available on the DSM desktop:


The standard administrator user "admin" has no password assigned by default. One should change this as soon as possible if unauthorized access shall be avoided.
Other users can be created and managed via the "User" admin tool. It is possible to create users with different levels of authorization and detailed access to folders and programs.

Creation of Disk Spaces and Folders

After a successful system installation it is time to create (logic) drives on the disk. This can be achieved by a program called "Disk Manager" which comes with the standard installation of DSM:


Via Storage Manager it is possible to create logical drives:


Note: on the screenshot, the drive has already has been created.

After the creation of a logical drive it is time to create folders on the drive.

Accessing the Disk Station Content via iPad (iOS Devices)

To begin with: it is not possible to access music files stored on the DS via iTunes on the iPad which seems to have restricted capacitites compared with the full fledged version on a PC. However, it is possible to access Music via iTunes on a Mac or Windows PC (see section below).
Nevertheless, it is possible to stream media files (music, video, photos) to an iOS device via special apps Synology provides for free in the app store. All in all there are 6 apps for iOS available, apps for Android & Windows Phone are available too:

  • DS Audio: streams music to the mobile device in a player similar to iTunes
  • DS Photo+: photo browser for the mobile device
  • DS Video: streams videos stored on the DS to mobile device
  • DS File: gives access to the DS file system
  • DS Download: didn't check

Accessing the Disk Station Content via Play Station

Getting access to my PS3 was a harder one. But this was not so much due to the PS3, but due to the features of the Airport Express which I use as WLAN router and DAC interface to the HiFi amplifier. To the details:
In the beginning, my Airport Express wlan configuration used the "Autochannel" option to determine the wlan channel the Airport uses. Having this option set, it was not possible to get the PS3 connected via wlan. I checed a couple of community threads and finally found a hint that helped me: if you are running your Airport Express / PS3 setup in an environment with some other wlans that interfere, the Airport switches to wlan channel 13. This seems to cause problems with the PS3. I cured this by manually setting the wlan channel of the Airport to some channel lower than 13 and the setup works ever since.

Back to the Synology-experience: After having fixed the network problems, the DS was automatically recognized as media server by the Playstation. for each category of the PS3 content (music, video, photos) a new folder icon appears giving access to the content stored on the DS. I can now stream music, video and photos directly to the PS3 without having the need to store the content there - very satisfying!

Accessing Music on a PC

The integration with a PC (Mac or Windows, Linux I don't know...) is straight forward. You can connect to the DS via a file browser and open files from there. You can open your iTunes library residing on the DS to listen to music´. Alternatively, you can run an iTunes Server on the Disk Station (available for download in the DS control panel). This iTunes Server makes the music stored in a directory called "Music" available as shared iTunes library. Note that this "iTunes Server" does not work as source to stream music to e.g. an iPad. You need to have a fully fledged iTunes on your remote machine to acces this iTunes Server on the DS

Summary

In the first blog post after the crash of my Time Capsule I formulated a couple if things I wanted to achieve with a replacement for the device:

  • Separate the disk from the WLAN router to avoid collateral damage if one of the devices breaks
  • We wanted to realize a setup which allows streaming music directly from the disk without the need to have a computer running
  • Connection to our HiFi equipment
  • Price should be kind of reasonable
  • With the TC I did the data backup manually, it would be nice to get this automated in a RAID array
  • What I got from reading a couple of forums, it would be nice if the device to come had an iTunes server on board.
  • I wanted as well to connect a PS3 to the disk to view photos via the PS3
Summarizing I can only say that all of these goals have been achieved. Up to now I cannot judge about the RAID functionality as I did not install a second hard disk yet, but I assume as it is one of the main characteristics of the DS212j that this will work without major problems.

Update from April 2013: I installed a second disk about a half a year ago. My initial assumption was right: istallation and setup of the second disk worked without problems. I created a RAID array with the two disks and it works ever since. Up to now I fortunately didn't have the chance to check that the RAID backup works, as none of the disks crashed.
All in all I am VERY content with the new setup. Streaming to the iPad works perfectly, the output to the HiFi amplifier via the Airport Express works seamless too. The only complaint I have about the Airport is the  limited number (only 1) of ethernet cable sockets the device has. The cooperation between the DS and the PS3 works as well very well, even if there was an Airport-induced challenge to master.

I hope that my article will help you to take your own decision, and you enjoyed reading.

Sunday, September 2, 2012

Nigeria Connection Reloaded - Neue Masche beim Vorschussbetrug

Heute habe ich eine Email mit "lustigem" Inhalt erhalten, von der ich schon gehofft hatte, dass diese Art von Spam endlich zur Vergangenheit gehört. Es scheint sich um eine Mail nach dem System des "Vorschussbetrugs" zu handeln (siehe z.B. Wikipedia). Da ich diese Masche noch nicht kennengelernt hatte, hier ein Bericht als Warnung an alle, die ebenfalls von betrügerischen Emails betroffen sind.

Schritt 1: Kontaktaufnahme Immobilienscout

Die (vermutlichen) Betrüger sind auf mich über eine Anzeige bei Immobilienscout24 aufmerksam geworden, in der meine Email nicht im Angebot erscheint. Schon wenige Stunden nach der Angebotsveröffentlichung erhielt eine normal aussehende Mail, die Interesse an der durch mich inserierten Immobilie signalisierte und um einen Besichtigungstermin bat.

Schritt 2: Antwort auf ein seriös wirkendes Angebot

Erfreut antwortete ich auf die Mail direkt auf meiner Mailbox - Immobilienscout bietet die Möglichkeit, direkt auf den in der Immobilienscout-Email auf einen Link zu klicken, der eine Antwort-Email meinerseits öffnet. Ich bot dem Email-Sender einen Besichtigungstermin in den nächsten Tagen an und wartete auf Anwort...

Schritt 3: Die Antwort kommt anders als erwartet...

Statt einer Bestätigung meines Terminvorschlags erhielt ich folgende Email:

Sehr geehrter Herr / Frau,
Mein Name ist <name>, ein US-Kapitän mit der Afrikanischen Union / United Nations Hybrid Operation in Darfur. Basierend auf den jüngsten US govt Entscheidung über einen Truppenabzug, habe ich geplant, um die Meeresumwelt zu beenden und zu verlagern, um Ihr Land. Lassen Sie mich Ihnen versichern, dass ich gehe, um Ihr Eigentum zu kaufen, aber zuerst möchte ich Ihnen ein Angebot machen. Ich habe in meinem Besitz die Summe von $ 19.8million (USDollar), die von einem unserer Angriffe auf einigen Rebellen Sponsoren und Unterwelt Drogenkartell hier geborgen wurde, weil sie die meisten ihr Geld behalten zu Hause für böse Tätigkeiten wie illegale Angebote für Rohöl , Waffen und Drogen.
Basierend auf den Leiden, die wir durchlaufen hier einige von uns treffen solches Glück. Es passiert, dass ich zu diesem Raid ging mit den Männern in meiner Einheit und ich beschlossen, es als meine Aktien nehmen für meine Stress hier in diesem Bösen und das Böse Land mit Selbstmordattentätern und Heckenschützen gefüllt. Ich legte das Geld mit einem roten Kreuz Agent. Es ist unter meiner Macht zu genehmigen Wer kommt weiter für dieses Geld.
Wo habe ich ein Problem ist, dieses Geld an jemanden dem ich vertrauen kann übertragen. Ich beabsichtige, dieses Geld auf Lager und Immobilien zu investieren. Ich kann mich nicht bewegen dieses Geld in die Vereinigten Staaten, weil ich zu Ihrem Land umziehen wird, wie ich es dort investieren wollen, so brauche ich jemanden, den ich vertrauen, um das Geld zu ihnen zu übertragen für die Verwahrung kann. Wenn Sie annehmen, werde ich das Geld nach Europa zu übertragen, wo Sie der Begünstigte werden, weil ich eine uniformierte Person bin und ich kann nicht paradieren eine solche Menge nur für den Fall, so brauche ich jemanden wie der Empfänger zu präsentieren. Als intelligente amerikanische Offizier, habe ich eine 100% authentische Mittel zur Übertragung der Geld durch einen diplomatischen Mitteln. Ich brauche nur Ihre Akzeptanz und alles ist getan.
Bitte, wenn Sie in dieser Transaktion interessiert sind werde ich Ihnen die kompletten Details, die Sie für uns die Durchführung dieser Transaktion erfolgreich. Ich glaube, ich kann Ihnen vertrauen. Wo wir jetzt sind, können wir nur durch unsere militärischen Kommunikationsmöglichkeiten, die gesichert, damit niemand unsere Gespräche überwachen kann, ist zu kommunizieren, dann kann ich im Detail zu erklären. Ich will nur erreichen Sie durch E-Mails, weil unsere Anrufe könnten überwacht werden, ich habe nur um sicher zu sein, wer ich bin zu tun haben.
Ich tue dies auf Vertrauen, sollten Sie verstehen, und wissen, dass als ausgebildeter Militärexperte Ich werde immer auf Nummer sicher, wenn Sie die schlechte Art sind, aber ich bete Sie sind es nicht. 19.8million Dollar ist eine Menge Geld und ein Traum von jedem.
Ich warte auf Ihre schnelle Antwort, so dass wir gehen können. In weniger als einer Woche sollte das Geld auf Ihrem Pflege festgestellt wurden, und ich werde kommen für mein Geld. Sie werden zu 35% des Geldes berechtigt werden, sobald Sie diesen Deal zu erreichen und 65% für mich ist. Ich hoffe, ich bin fair auf dieser Deal.
Mit freundlichen Grüßen,
Capt <name>.
Wenn ich auf dieses "verlockende" Angebot eingehen würde, würde ich früher oder später höchstwahrscheinlich aufgefordert, meine Bankverbindung anzugeben und "Gebühren" an den "Hilfesuchenden" zu überweisen, damit die "Banktransaktion" angestoßen werden kann. Es ist natürlich klar, dass mein Geld auf Nimmerwiedersehen weg wäre und die Millionensummen niemals auf meinem Konto eingehen würden. Die Masche ist ebenfalls schön durch http://www.frithjof.de/nigeria.htm beschrieben.

Fazit

Wie man sieht, ist die als "Nigeria-Connection" bekannte Masche wieder verstärkt aktiv. Ich rate jedem davon ab auf eine solche Mail zu antworten. Wer es dennoch getan hat, kann mir ja mal erzählen, was er daraufhin erlebt hat - ich bin gespannt....